Creating "Clappison Junction”
This tutorial takes you through the steps of creating a brand new layout with the Scenery Toolkit, starting with a blank grid. We've chosen to design a simple loop with some sidings for industries and a future station.
As with all good design concepts, we suggest that you start out with a rough idea of what you want your finished layout to look like. Do you want a lot of scenery or do you prefer bustling industries? This planning stage will help you decide what key design elements you want and where you would like to place them on your layout. In virtual model railroading though, the key is having a good imagination and “feel” for what you want your railroad to portray. If it does not look right the first time, you can rip up some or all of it and revise it as often as it takes.
But, remember, the first goal of model railroading and virtual railroading is to have FUN!!
Step 1 – Getting started
Use File New to open a new layout file.
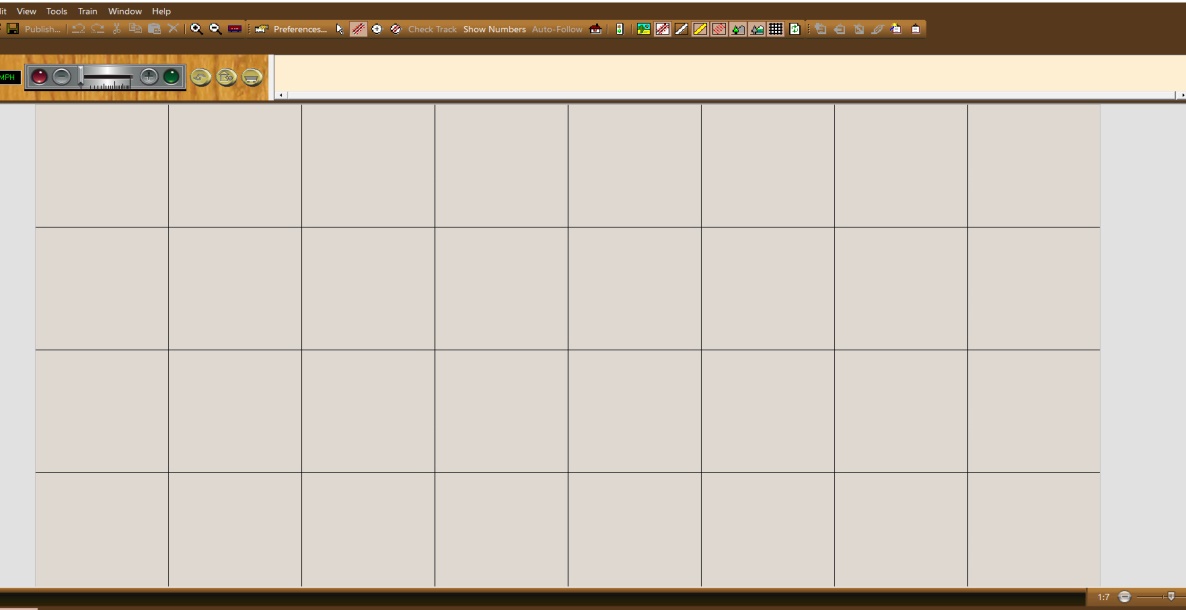
For this tutorial, select HO 4x8.
When the image opens, the grid appears in a default position.
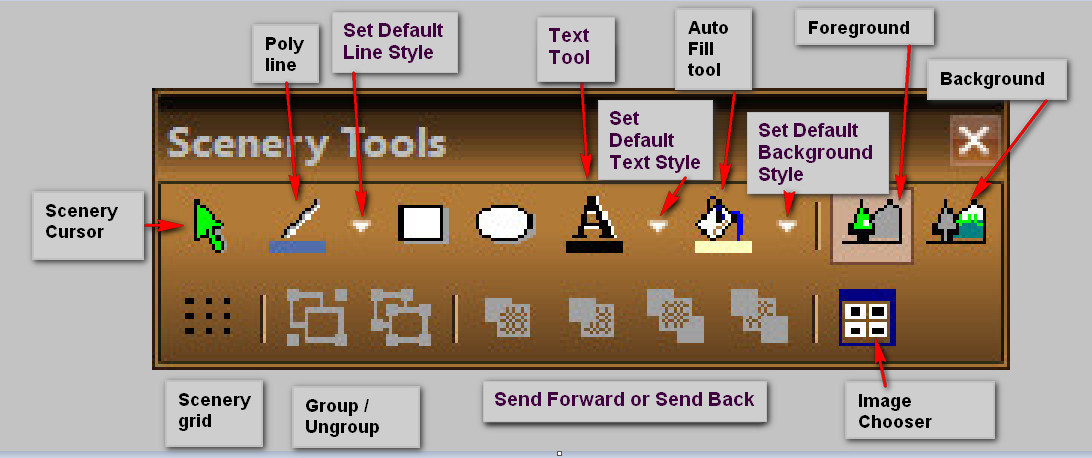
Here’s an overview of your new Scenery toolbar:
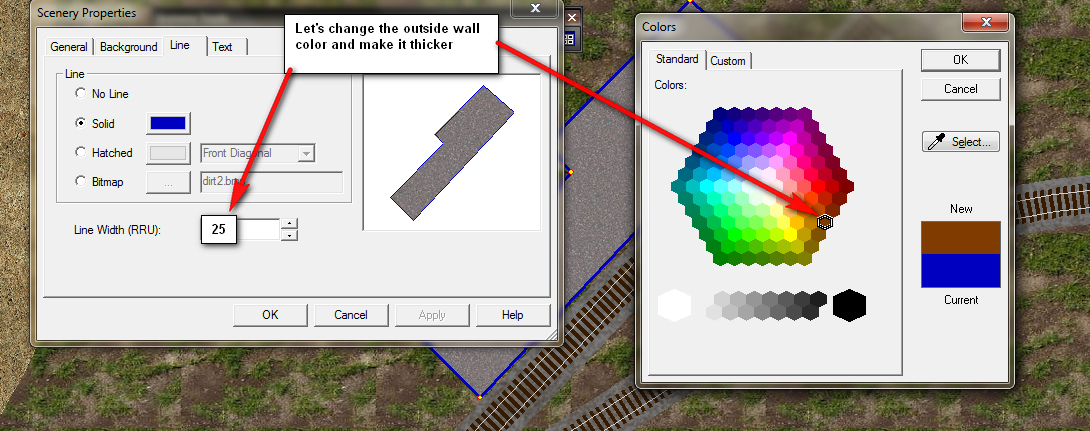
Click on the drop arrow attached to the Polyline tool on the Scenery toolbar which opens the Line tab of the Scenery Styles Dialog.
So we chose a solid brown line color and a fairly thick outside edge line, as shown here.

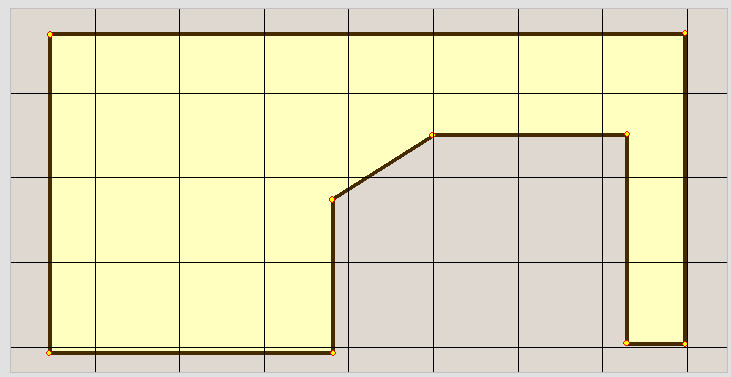
Let’s try an “around the walls” corner layout design. Using your Polyline tool draw the outside perimeter for your desired layout plan.
The yellow shaded are represents the background color of our layout which we will want to change.
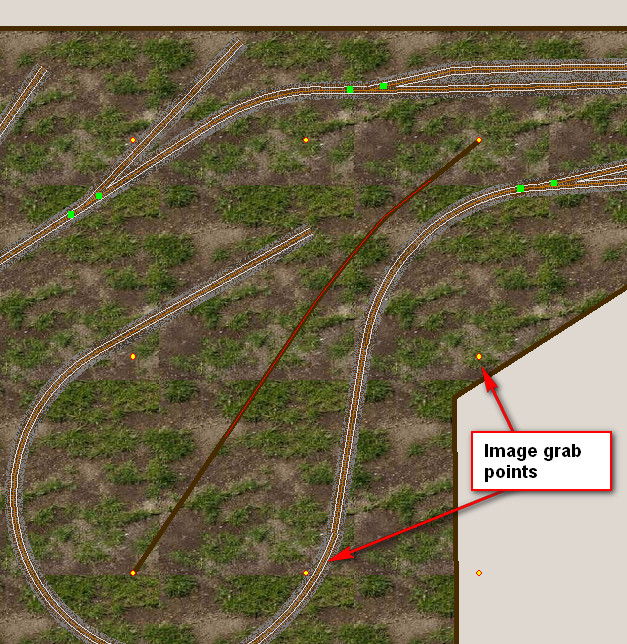
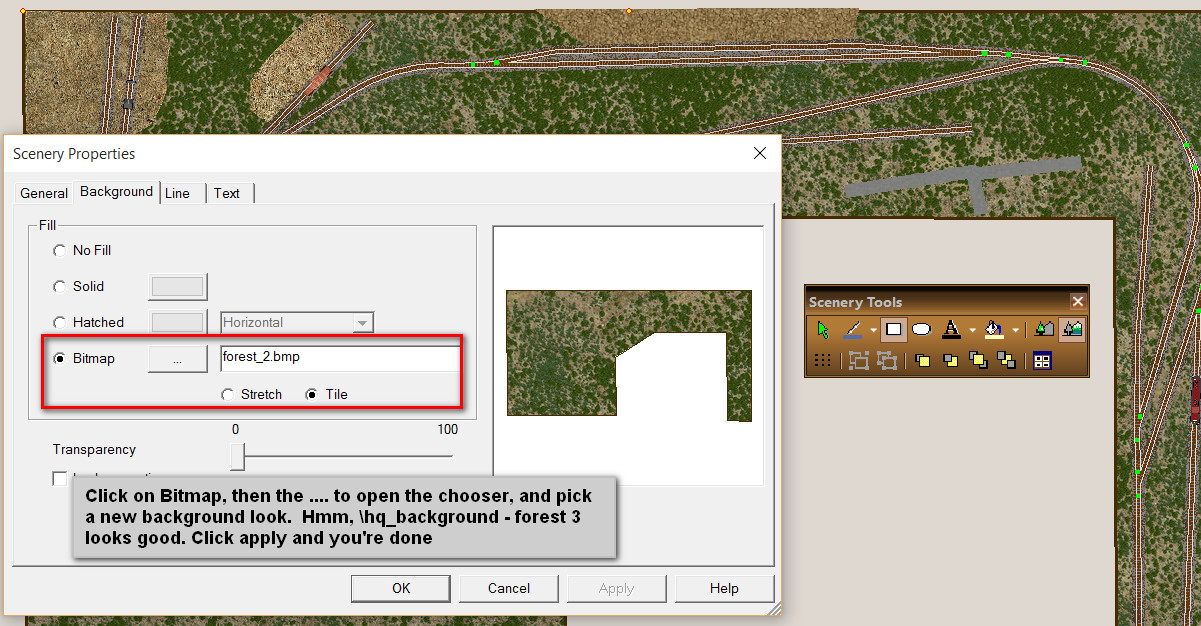
Click on the layout shape until you see the grab points light up. Then use a right mouse click to bring up a context menu where you can choose “Load Bitmap” or on that same menu, you can scroll down to properties and select the Scenery Chooser here.
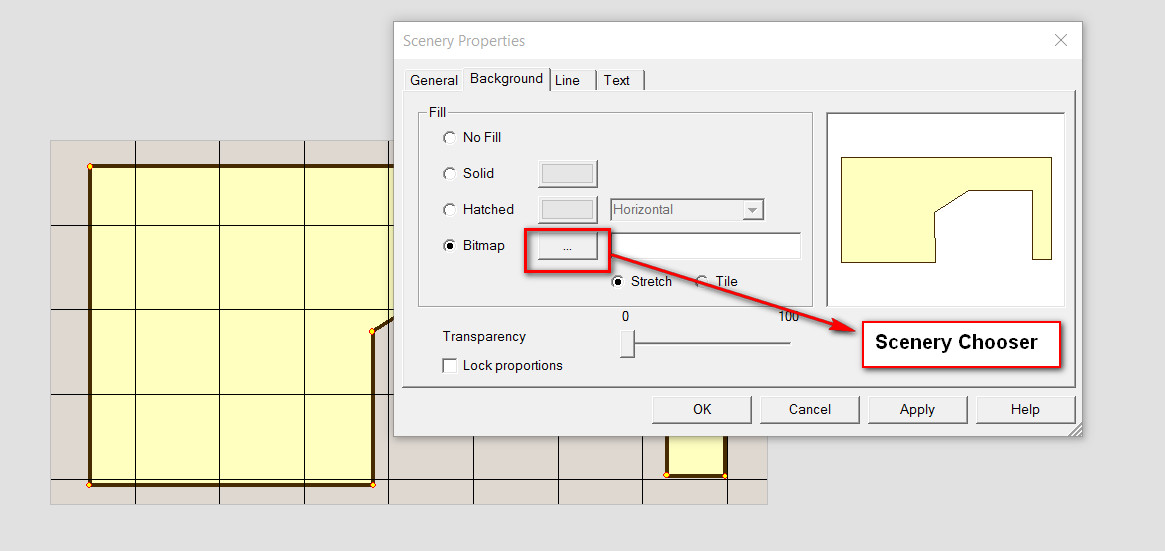
Select a bitmap from the hq_background folder, ensure the image will be tiled and Apply it to your background.
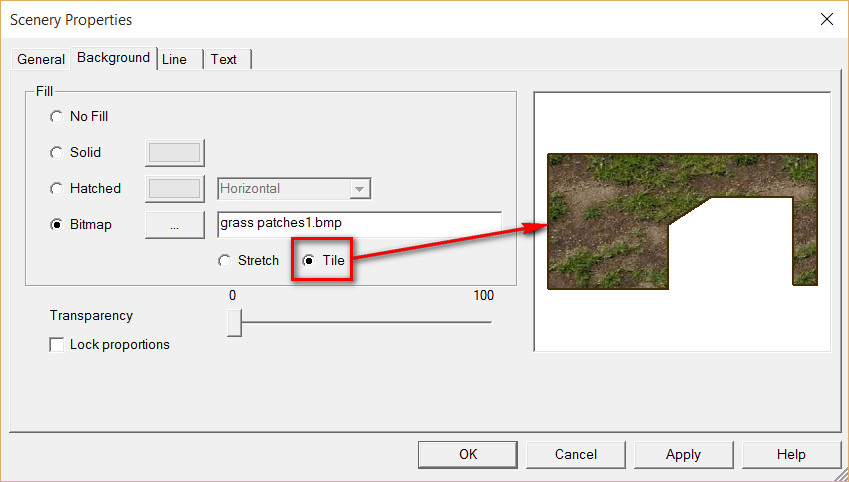
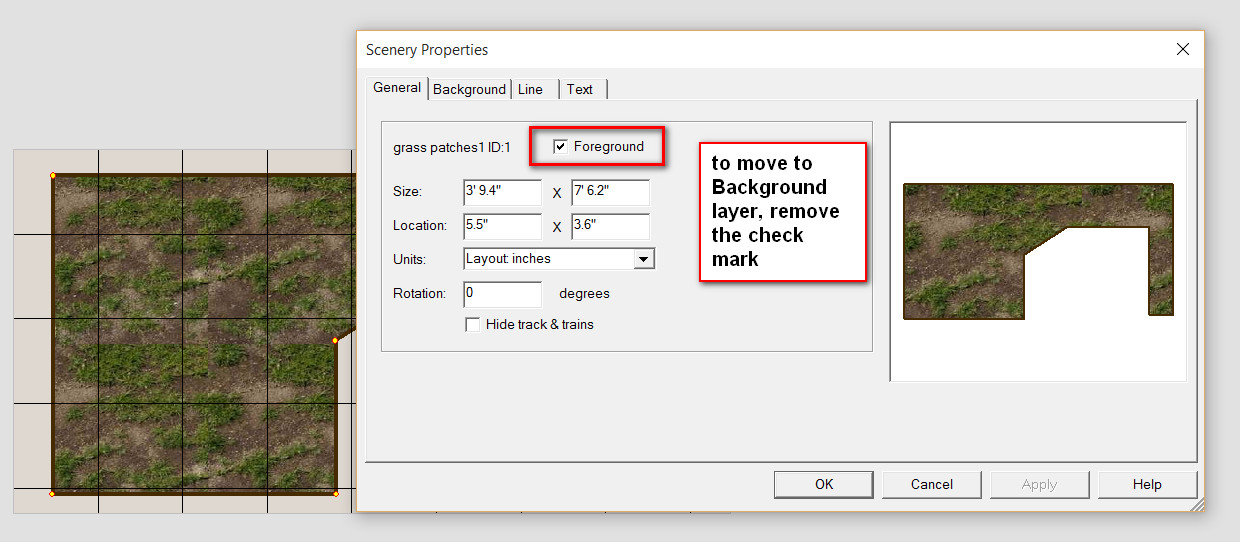
Next we want to make sure that this background image is placed in the Background layer of the overall design. This is important since TrainPlayer / TrackLayer now will place ties [sleepers], roadbed and rails ABOVE anything appearing in the background layer.
To achieve this select the General tab and remove the tick from the Foreground check box.
Step 2 – Track Design and Initial placement
Once I have my main background layer ready, I like to do the first run through of adding a track design. If you’ve completed the TrackLayer tutorial you will have the basic knowledge to lay track for this layout.
Since I want this plan to have a working junction where inbound / outbound freight traffic is exchanged, I have decided to go for an “out and back” plan with several industrial sidings to switch.
Here’s the first view of that plan:
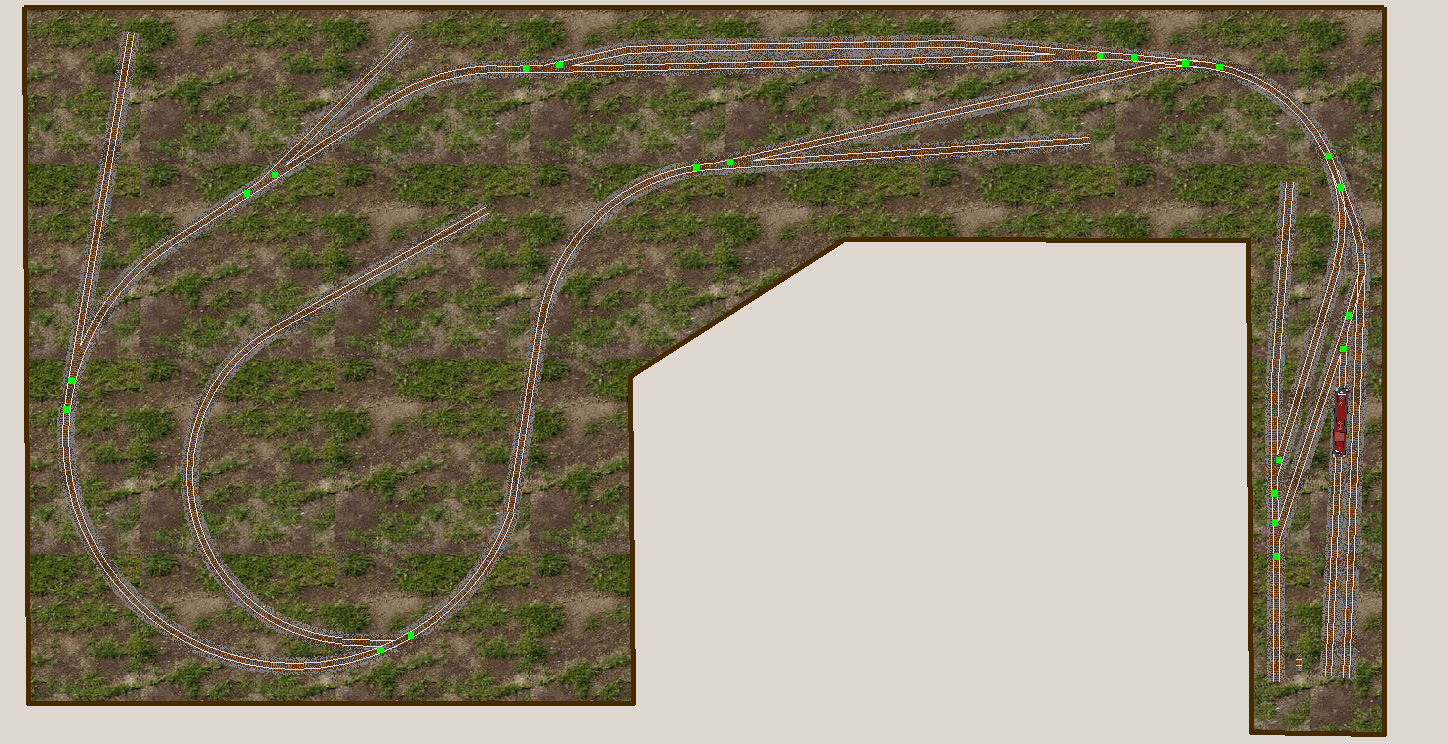
As you can see, I placed an engine in the yard on the right side. Based on its original size / appearance, I used the Track grid to re-size the layout to a more N scale proportion. That’s part of the beauty of a virtual railroad – flexibility.
I also decided I wanted a Scenic Divider on the left side to keep the “industrial” side separate from the rural section.
So I again opened the Scenery Polyline tool to alter its characteristics:
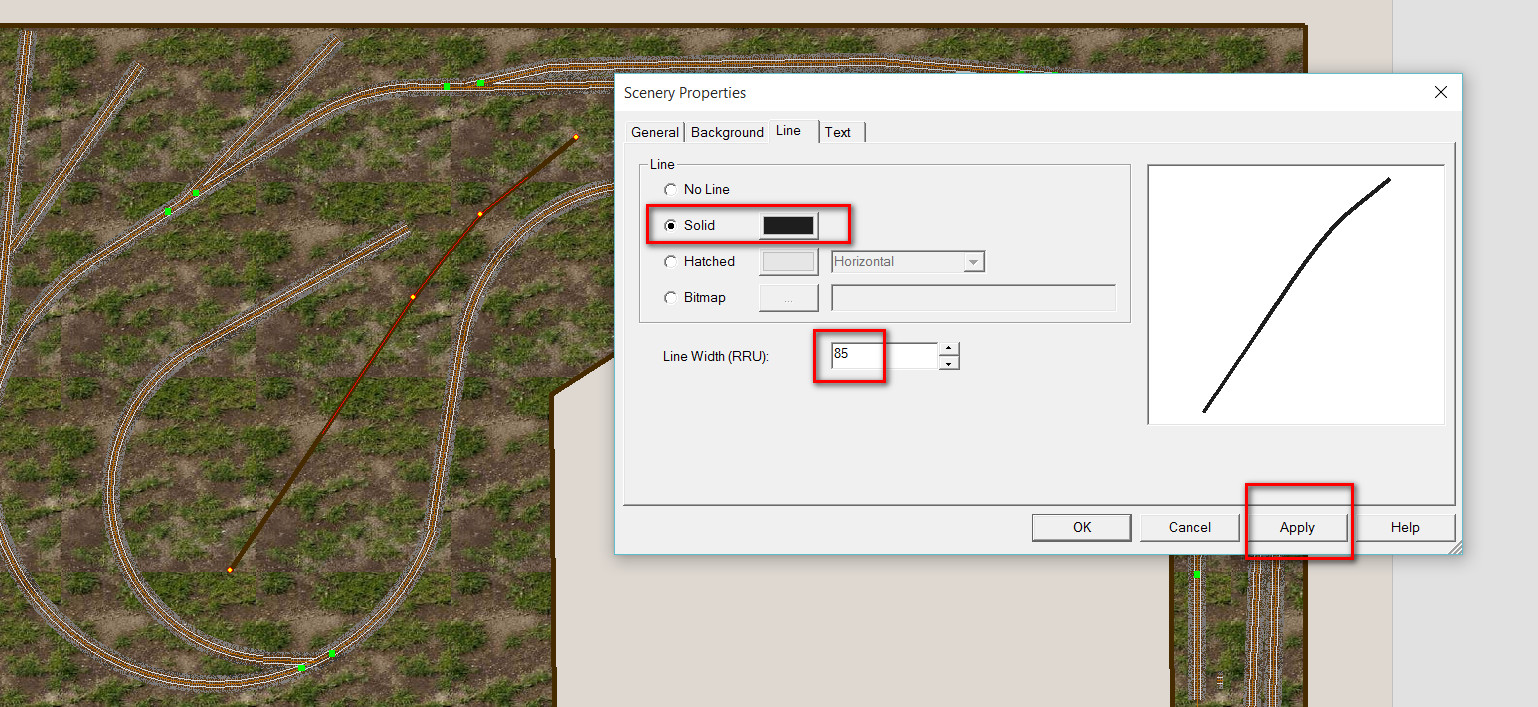
Note: If you hold the SHIFT key down while drawing your line, it will create a more natural looking curve as you try to follow the layout contours.
Here’s what it looks like completed and in place.
If you click on either of the end points, you will activate the grab points which allow you to access its properties menu to make the Scenic Divider line wider or change its color.
New Feature
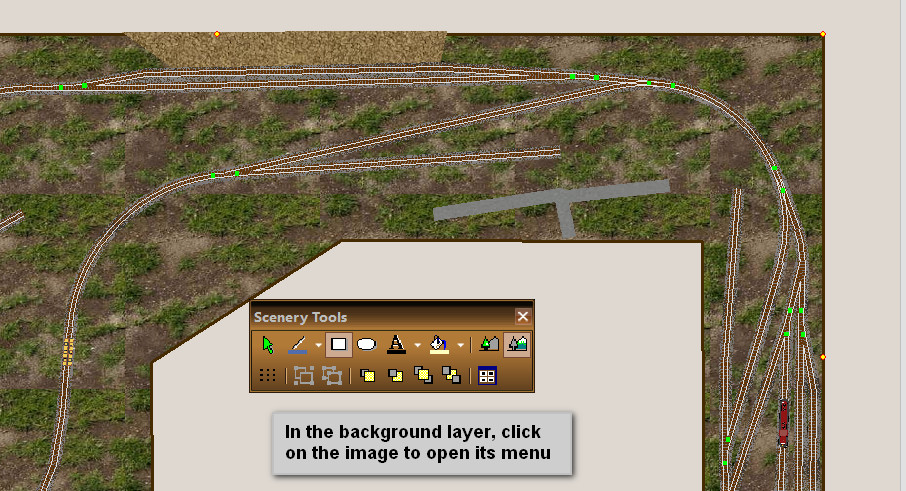
With this latest upgrade to the Scenery toolkit, it is now very easy to swap out the background image by first opening the property menu background image.
So with your layout in BACKGROUND MODE, click anywhere on the image to select it.
Then do a right mouse click and select properties from the menu choices offered.
Remember to save your work often.
You can do this automatically by going to File\Preferences\General tab and turn on AutoSave to save your work every 5 minutes. If your system crashes for some reason, you can retrieve your latest auto-saved position by using File\Restore Backup and then scrolling down the list offered to find it.
Step 3 – working with existing images from the Scenery chooser
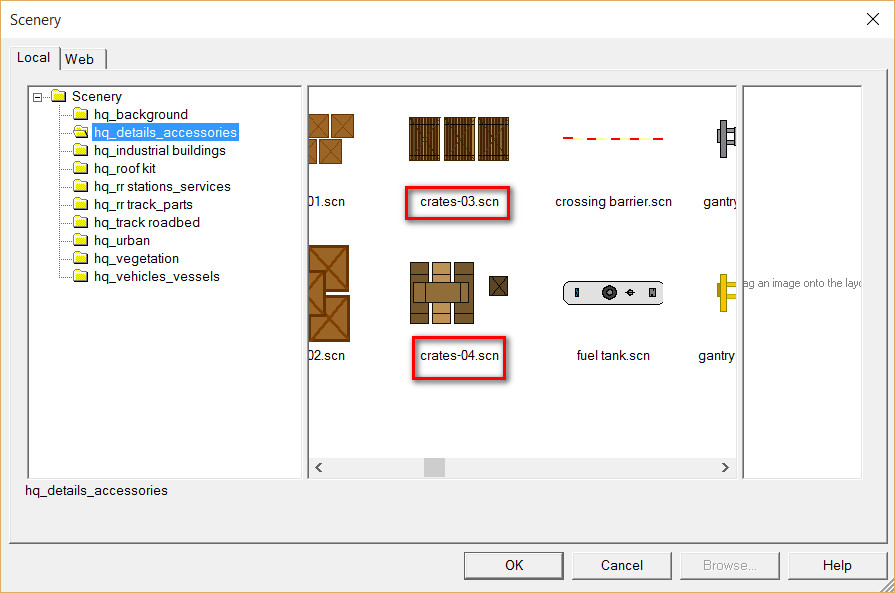
When you first open the Scenery chooser and scroll down to this folder, for example, you will see files ending in SCN.
These are vector graphic images which have far more flexibility and offer great details even at very close zoom ratios of 1:1 or better. Essentially they are composed of simple straight lines, circles and arcs and are pieced together and GROUPED into a finished image.
For your convenience, we have set up a series of HQ folders \ libraries consisting of largely SCN images and some BMP images. The point to remember with SCNs is this: if you select an image from our library, you can also remove unneeded or unwanted pieces from that image to create a slightly different structure.
Here’s the exercise.
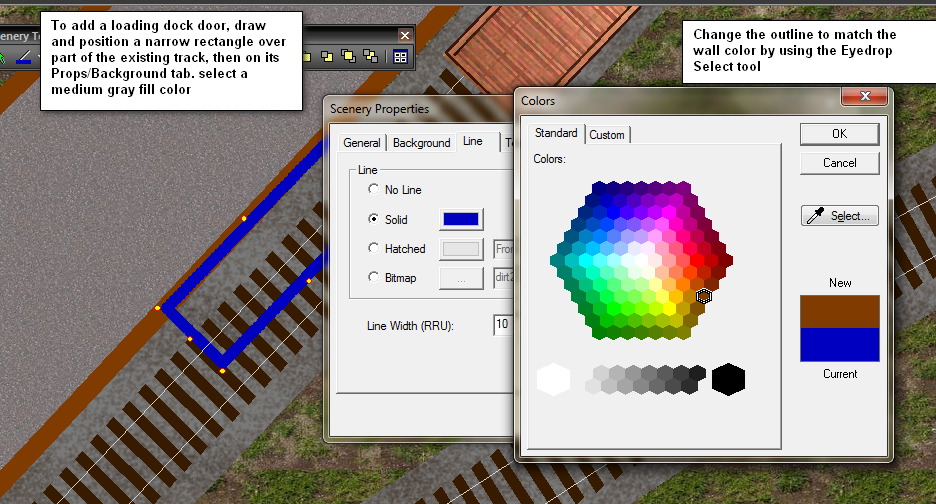
We want to add a coal mine in the top right portion of our new layout BUT we don’t have enough layout space for the image in the chooser. Now you can scratch build one OR you can modify an existing one.
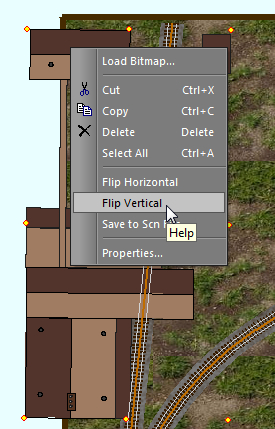
So we go to the chooser \hq_industrial buildings and pick a coal mine. It is too big, so we click on it to reduce it in size then right click again to Flip it vertically.
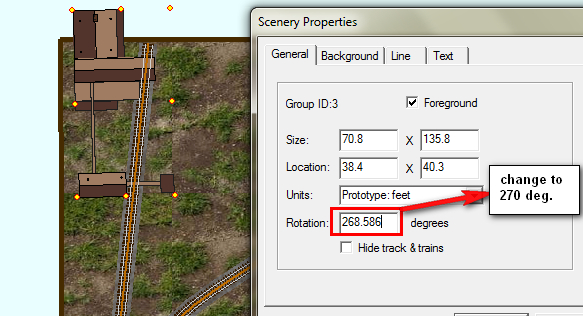
We’ve shrunk the mine and flipped it but notice it is slightly crooked. Open the Properties again and on the General tab, adjust the rotation to 270°.
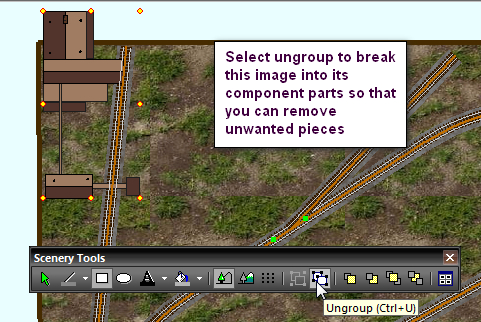
Ungroup the image and then delete the unwanted part of the image that extends beyond the baseboard.
From this view, you can see that we have removed a large part of the mine which would have been beyond the outside edge of the layout.
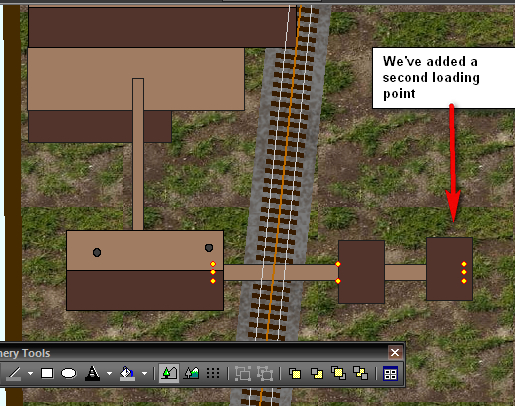
Now we want to add a second loader and re-position the final revised assembly.
You can either, click on the first loader and do a copy /paste OR draw a new loading point.
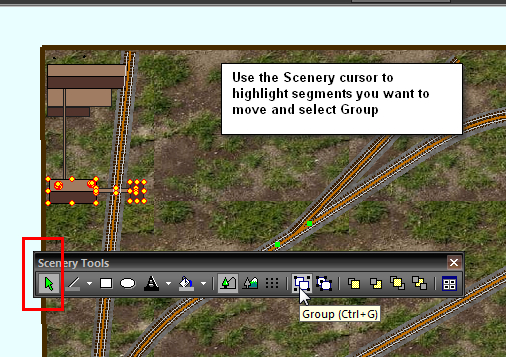
For the link shaft, you need to ungroup the image, click on the horizontal shaft and stretch its centre point to run over to the second loader.
Use your Bring Forward / Send back to adjust the position of that link shaft.
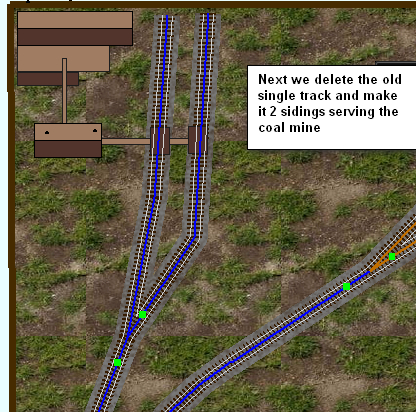
Now we want to change our original track design to reflect this change to our coal mine
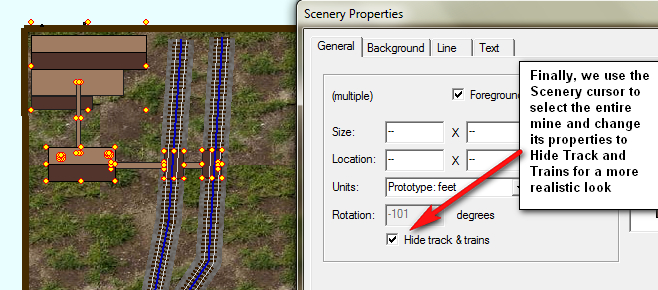
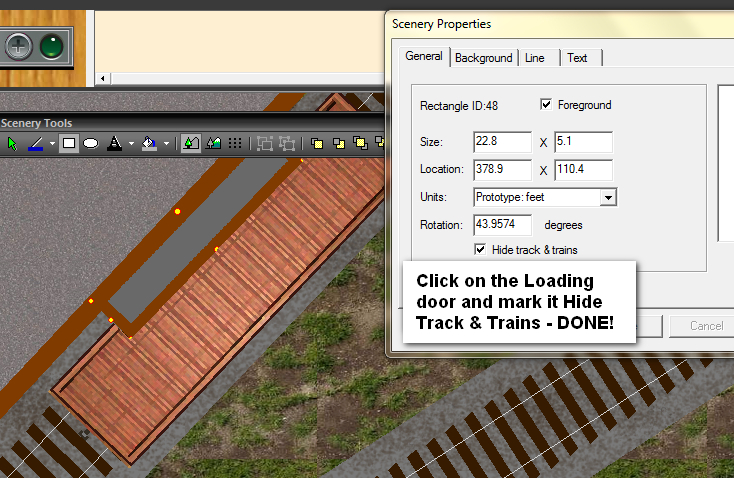
Since both loading points along with the coal mine structure itself are in the Foreground layer, it looks like the train will plow right through the structure. In previous versions of TrainPlayer, you would have drawn a clipping box around each loader so that the hoppers looked like they passed under the loader. You can still do that using the track tools OR, you can use the revised Hide Track and Trains feature [HTT].
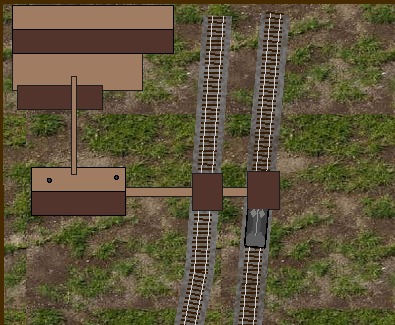
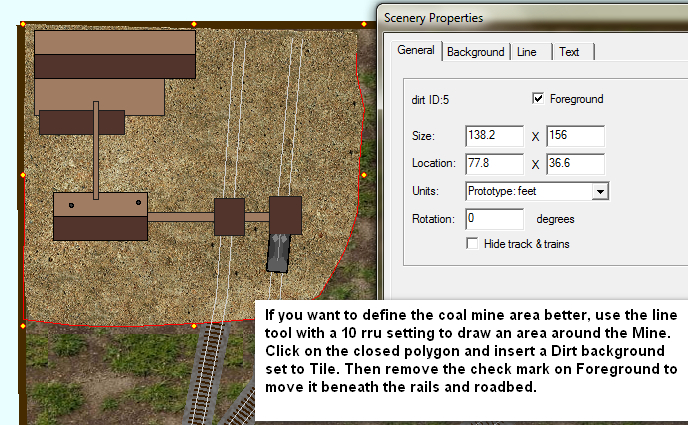
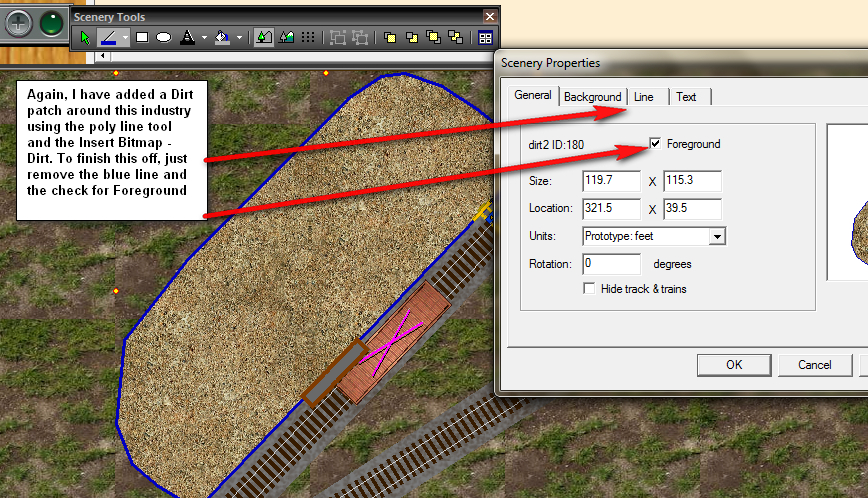
The placement of the hopper looks more realistic now but I think we need to add a different texture to the ground surrounding this mine.
Use the Drop arrow alongside the Polyline tool to set a 10 rru line.
Use the Drop arrow alongside the Paintbucket tool to select Bitmap and a Dirt background.
Then use the Polyline tool to draw a polygon around the mine.
Initially the image will obscure the underlying scenery, so right click the image and remove the checkmark from the Foreground checkbox to send the new object to the Background layer.
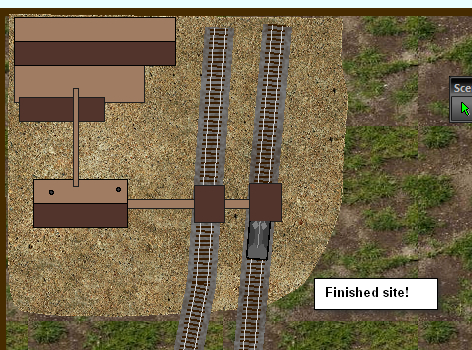
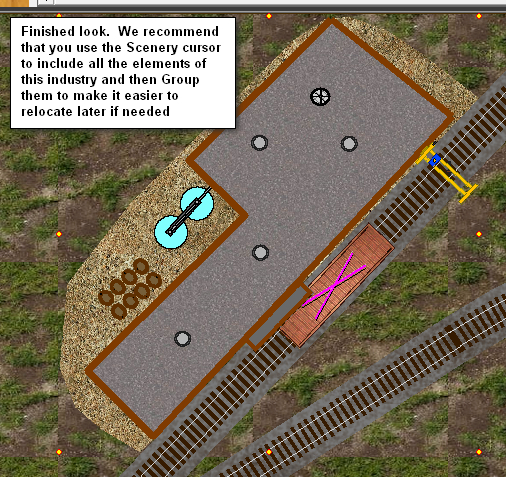
This is
what it looks like when finished.
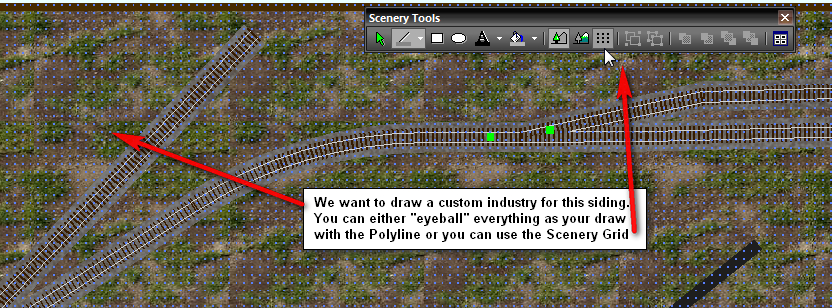
Step 4 Creating a custom SCN image to suit a particular space
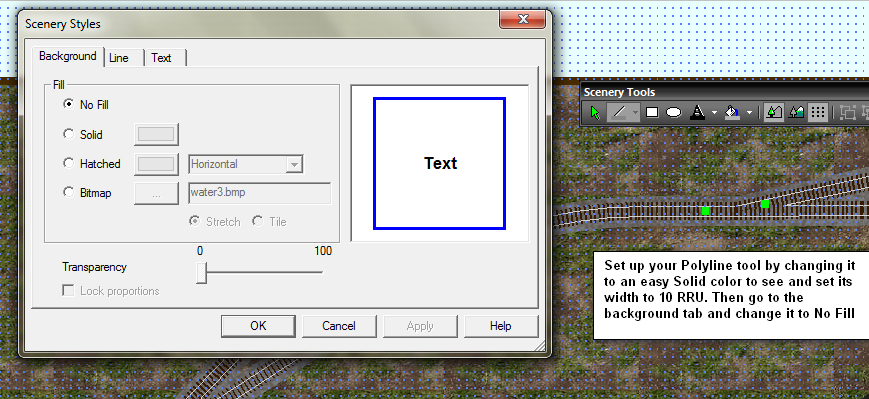
In this part of the tutorial, we are going to make our own SCN. This latest Scenery toolkit allows you to draw free hand using either tools at hand [poly line rectangle or circle] which you can customize to the line width and color of your choice.
Another option is to use the Scenery Grid feature to help you more exactly position and connect various pieces.
To customize the Grid feature, go to File\Preferences\Scenery and there you can change the color of the grid dots and you can also add more dots to suit your needs.
If
you’re drawing using a zoom level of 1:2, then you might
want to set your dots per inch pattern to 50 RRUs in the Scenery tab of
the Preferences menu.
Once you’ve completed the outside walls of your structure, you may want to change the color of the walls.
Starting to come together!
Now we want to add accessories to the roof top and add images around the outside of the building. First go to chooser, hq_ roof kit and pick some fans and vents to suit your time period. Just click and drag to your layout.
Some of these images may appear quite large when first placed on your plan. No worries just click on the image and use SHIFT+ drag to reduce it in size to suit the building.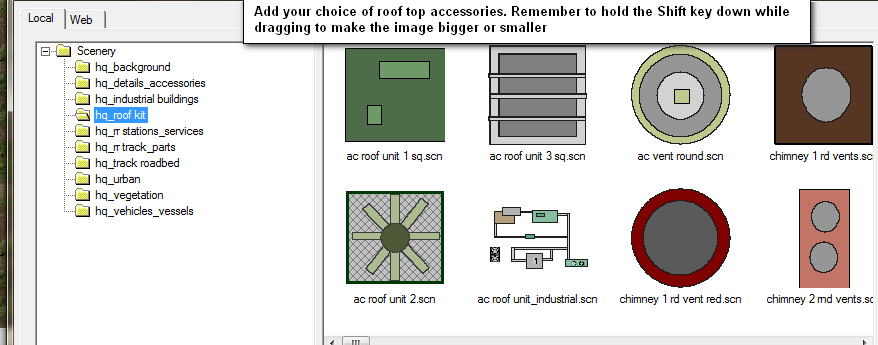
Like the coal mine, we want a different texture for the base of this factory so we add one to the background layer:
Initially
this will be drawn on top of the Factory and you
will need to remove the check mark from the Foreground box to send it
to the background layer.
Finished
Factory image.
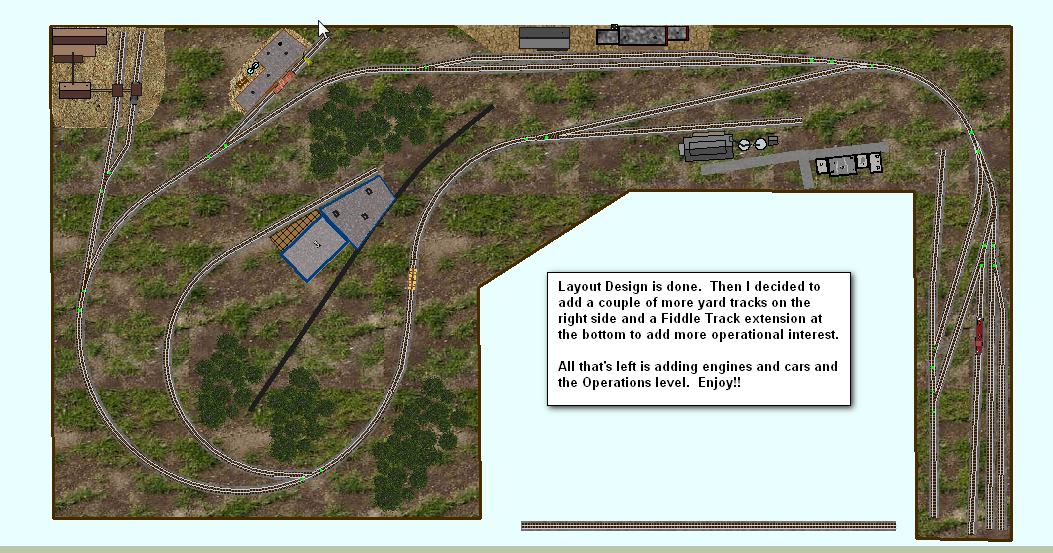
Step 6 – It’s not finished until YOU say so
So I looked at this plan in the light of a new day and decided it had almost everything but I wanted a small yard space and a fiddle track extension to add more / different cars to my layout.
Normally
you might have used
the Export Image to a Background JPG image feature [which is what the
vast majority of our track plan database of 2,700 plans uses today]
But
not anymore!!
With the new Scenery tool kit you can revisit any layout made with these Scenery tools and change some or all of it while leaving the track layer and the operations layer intact.
Let me show you some simple things:
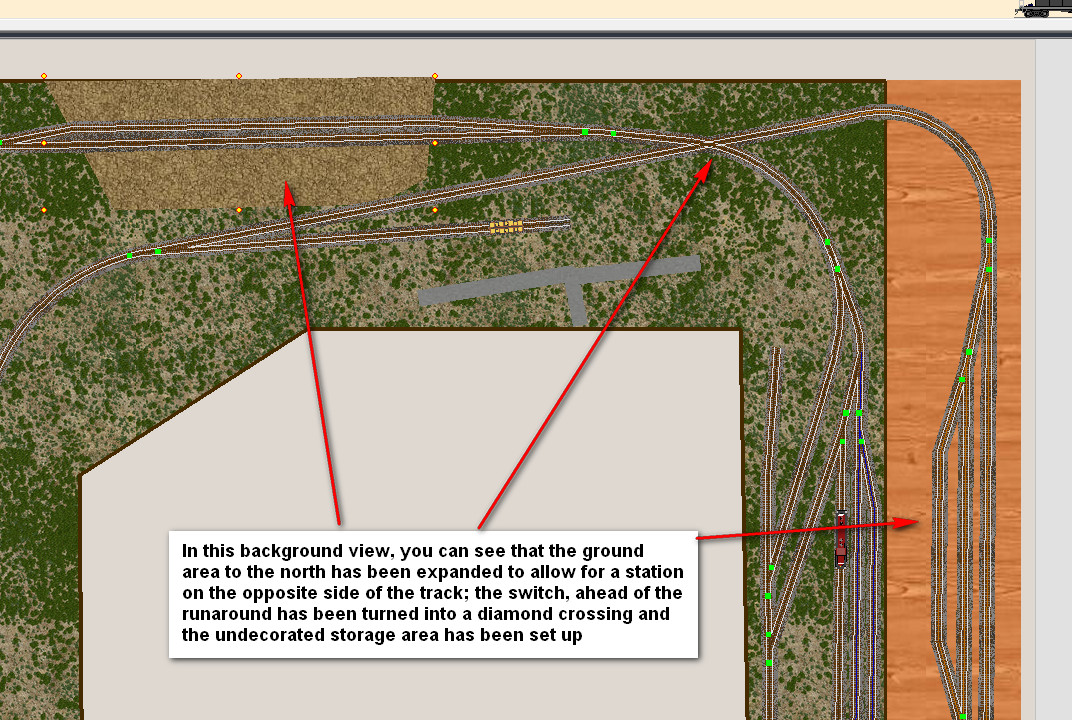
In this view you can see the additional fiddle track at the bottom of the centre screen. It is linked via a couple of pieces of hidden track. Also on the right side I added two yard tracks lengthened them out.
Then I thought I might want a continuous run with a Doodlebug entering from the junction, doing a loop and exiting again to a staging area. And instead of the fiddle track, I’d rather have some partially hidden staging.
Here’s what we did to accomplish all that:
First off you need to Re-size your layout dimensions. Go to Tools \ Resize\Re-scale which will bring up a descriptive note on what you need to do. I happen to have the Re-size feature added to my track toolbar

So now I need to expand the visible layout to the south end and add the semi-hidden staging on the right hand side of the plan.
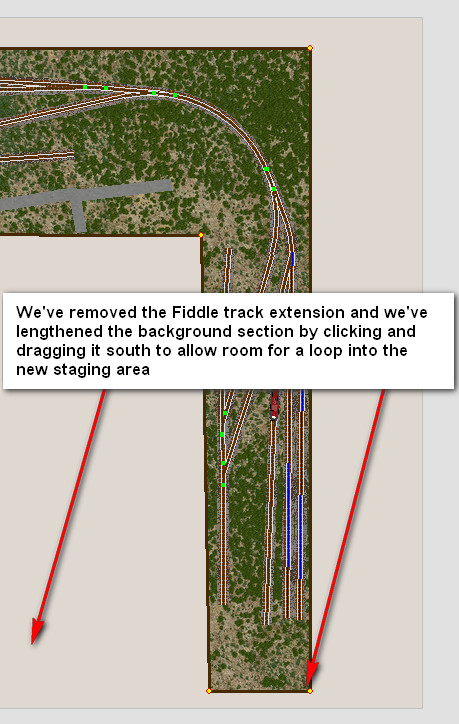
Next I used the rectangle tool to draw a new background for
the staging area.
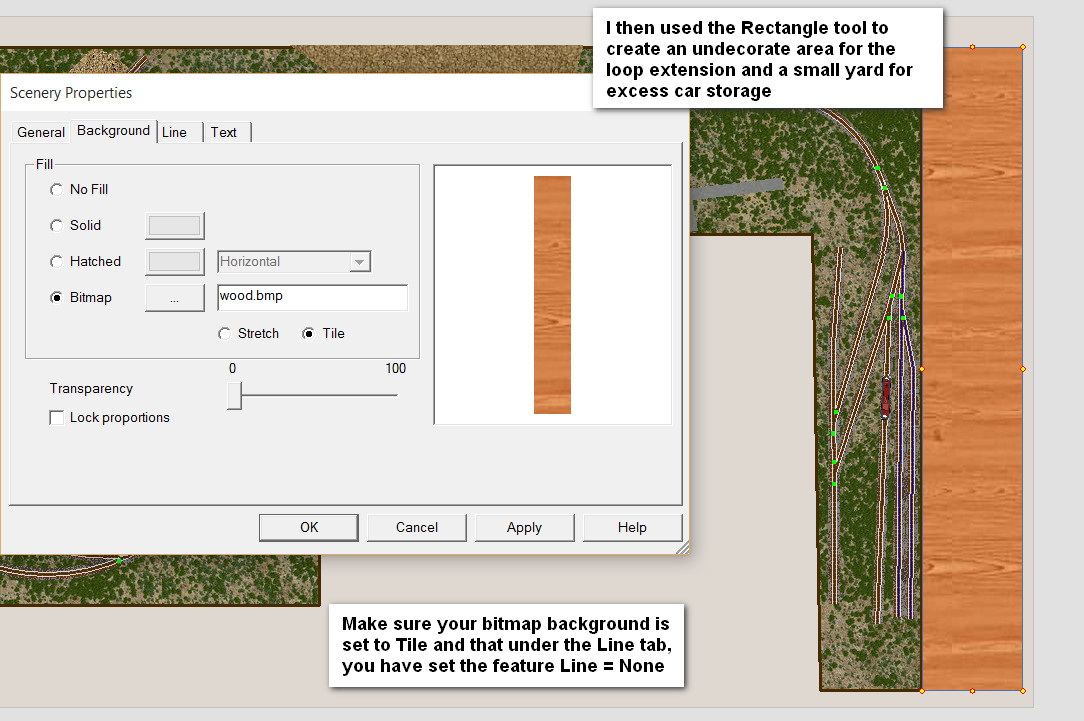
Then I
used the tracklaying tools to add the new staging
tracks.
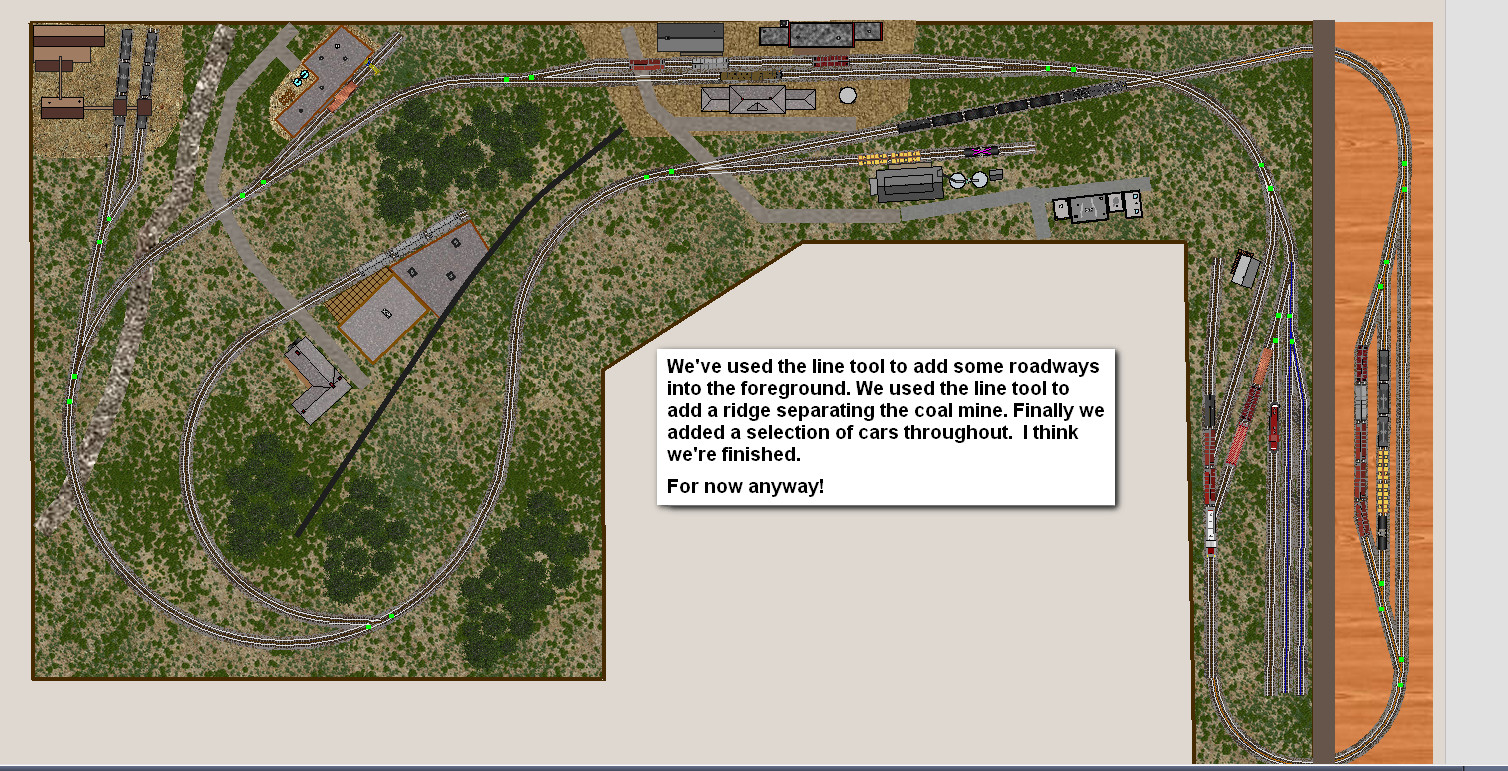
The finished look at 1:20 zoom ratio.
But the real strength of the new Scenery tools becomes more evident the closer you zoom into the action:

The local has just dropped incoming cars on the exchange track and has picked up its cars headed back to the main hub.
Keep those rails shiny!!
Enjoy.
